There are many libraries in python which can be used for GUI development on various different platforms. Today we will talk about tkinter. The tkinter package is the de-facto standard Python interface to the Tk GUI toolkit, which is available on most systems including Unix and Windows. Here we give a few simple examples of how to use this package in python 3 for GUI development.
Hello world:
from tkinter import *
window = Tk()
window.title("Hello world !")
window.mainloop()

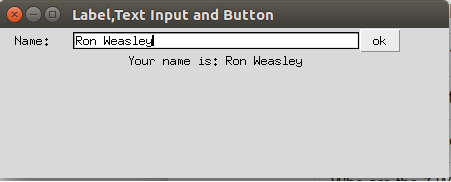
Labels, Text Input and Button
from tkinter import *
window = Tk()
window.geometry("450x150")
window.title("Label,Text Input and Button")
label1 = Label(window, text = "Name: ", width = 10)
label1.grid(column = 0, row = 0)
input_field = Entry(window, width =40)
input_field.grid(column = 1, row = 0)
label2 = Label(window, text = "", width = 40)
label2.grid(column=1, row=1)
def on_click():
    txt = "Your name is: " + input_field.get()
    label2.configure(text = txt)
button = Button(window, text = "ok", command = on_click)
button.grid(column=2, row=0)
window.mainloop()
Layout managers – pack, place and grid
Layout managers place, pack and grid are used in tkinter to arrange widgets on the screen. On each tkinter screen only one layout manager must be used.
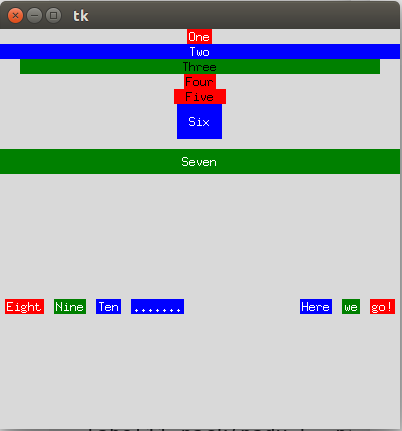
Pack
With the pack layout manager, a widget’s precise position on screen need not be specified. A widget can be displayed on the screen by simply using the widget.pack() command, where in the brackets, one can also specify additional display options, as in the example below.
from tkinter import *
window = Tk()
window.geometry("400x400")
label1 = Label(window, text="One", bg="red", fg="white")
label1.pack()
label2 = Label(window, text="Two", bg="blue", fg="white")
label2.pack(fill=X) # with fill=X horizontal length will be streched to fill the window
label3 = Label(window, text="Three", bg="green", fg="black")
label3.pack(fill=X, padx=20) # padx for external horizontal padding
label4 = Label(window, text="Four", bg="red", fg="black")
label4.pack()
label5 = Label(window, text="Five", bg="red", fg="black")
label5.pack(ipadx = 10) # ipadx for internal horizontal padding
label6 = Label(window, text="Six", bg="blue", fg="white")
label6.pack(ipadx=10, ipady=10) # ipady for internal vertical padding
label7 = Label(window, text="Seven", bg="green", fg="white")
label7.pack(fill=X, pady=10, ipady=5) # pady for external vertical padding

label8 = Label(window, text="Eight", bg="red", fg="white")
label8.pack(padx=5, pady=10, side=LEFT)
label9 = Label(window, text="Nine", bg="green", fg="white")
label9.pack(padx=5, pady=10, side=LEFT)
label10 = Label(window, text="Ten", bg="blue", fg="white")
label10.pack(padx=5, pady=10, side=LEFT)

labelb = Label(window, text=".......", bg="blue", fg="white")
labelb.pack(padx=5, pady=10, side=LEFT)

label11 = Label(window, text="go!", bg="red", fg="white")
label11.pack(padx=5, pady=10, side=RIGHT)
label12 = Label(window, text="we", bg="green", fg="white")
label12.pack(padx=5, pady=10, side=RIGHT)
label13 = Label(window, text="Here", bg="blue", fg="white")
label13.pack(padx=5, pady=10, side=RIGHT)
window.mainloop()
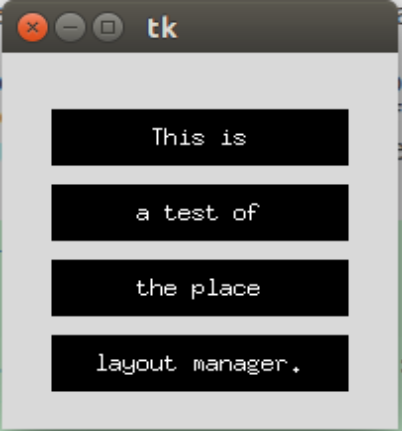
Place:
With Place layout manager the position and size of the widgets can be set explicitly.
from tkinter import *
window = Tk()

window.geometry("200x200")

label1 = Label(window, text = "This is", bg = 'black', fg = 'white')
label1.place(x=25, y=30, width = 150, height=30)
label2 = Label(window, text = "a test of", bg = 'black', fg = 'white')
label2.place(x=25, y=30 + 40, width = 150, height=30)
label3 = Label(window, text = "the place", bg = 'black', fg = 'white')
label3.place(x=25, y=30+ 2*40, width = 150, height=30)
label4 = Label(window, text = "layout manager.", bg = 'black', fg = 'white')
label4.place(x=25, y=30+3*40, width = 150, height=30)

window.mainloop()
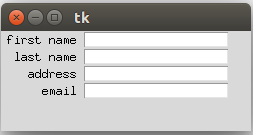
Grid
Grid is similar to pack in the sense that there is not need to specify the precise position of widget on the screen. The difference from pack is that it arranges widgets in a grid of rows and columns.
from tkinter import *

window = Tk()
window.geometry("250x100")
user_info = ["first name", "last name", "address", "email"]

row_num = 0
for required_info in user_info:
    Label(window, text = required_info, anchor = E, width=10, padx=5).grid(row=row_num, column=0)
    Entry(window).grid(row=row_num, column=1)
    row_num += 1

window.mainloop()